Perspex is a well-recognized brand name for acrylic or PMMA (polymethyl methacrylate). However, Perspex works require optimal precision for commercial purposes, especially during the cutting process.
Improper cutting results in an uneven edge or crack, compromising the integrity and aesthetic value. This article digs up the different industrial methods of cutting Perspex with a clean edge and minimal risks.
Tools to Cut Acrylic Sheets
Employing the right gears and techniques is obligatory to cut acrylic sheets effectively. Proper gears also retain material quality to achieve a clean and straight edge. And the topmost gears categorized by functionality, material suitability, and versatility are –
A. Hand Tools
Hand-operated machinery is a cost-effective option that is ideal for thin plexiglass sheets or small-scale projects. They offer sufficient control with simplicity for beginners and DIY enthusiasts.
- Utility Knife or Scoring Tool: It’s suitable for thin sheets up to 5 mm in thickness. A scoring knife creates a deep groove along the cutting line after several passes. You can snap the acrylic sheet cleanly along the scored line.
Utility knives offer similar functionality for straight cuts or minor adjustments. The compact gear is easy to use, accomplishing simple tasks with precision.
- Hacksaw: A hacksaw is a manually operated saw with a fine-toothed blade. It’s suitable for moderate precision cuts on thinner acrylic sheets. The tool seems beneficial for projects where access to power is limited.
Its precise manual control initiates a straight line with curved details. But it takes physical effort. Also, cutting acrylic of thicker sheets may lead to rough edges.

B. Power Tools
A power tool (electrical saw) has been the go-to option for medium-thick to thick Perspex sheets. They offer immense efficiency and superior versatility for almost all large-scale projects.
- Jigsaw: A jigsaw with the right blade seems ideal for cutting a curved edge and intricate designs. You’ll receive flexibility for non-linear shapes for creative or decorative projects.
Operating the jigsaw at a low-to-moderate speed can prevent heat buildup to protect the plexiglass edge. Curved and detailed work prevails through easy maneuverability upon proper blade selection.
- Circular Saw: It comes with a fine-toothed carbide blade is highly effective for straight and precise cuts. The electric saw is suitable for medium-thick acrylic sheets, ensuring a smooth edge when used with consistent pressure.
The tool is perfect for cutting acrylic plastics (large pieces) of medium thickness without compromising precision. But it produces dust that requires a steady hand to avoid jagged edges.
- Table Saws: It’s an excellent option for cutting large or thick plexiglass sheets. A table saw offers stability and blade consistency for straight, clean cuts. You can operate on extended acrylic sheets of massive length.
It’s often equipped with an acrylic-specific blade to handle demanding projects. However, it requires expertise in terms of managing the heat with cooling measures.

C. Advanced Techniques for Cutting Acrylic
Modern techniques leverage scientific technology to achieve precision, efficiency, and versatility. They’re equally applicable for commercial, professional, or complex projects.
- Laser Cutting: The technology remains on top due to its ability to produce high-precision cuts with a smooth edge. Concentrated light beams cut acrylic sheets without physical contact to avoid chipping or cracking risks.
It’s particularly suitable for intricate designs, small patterns, or large-scale production with consistent results.
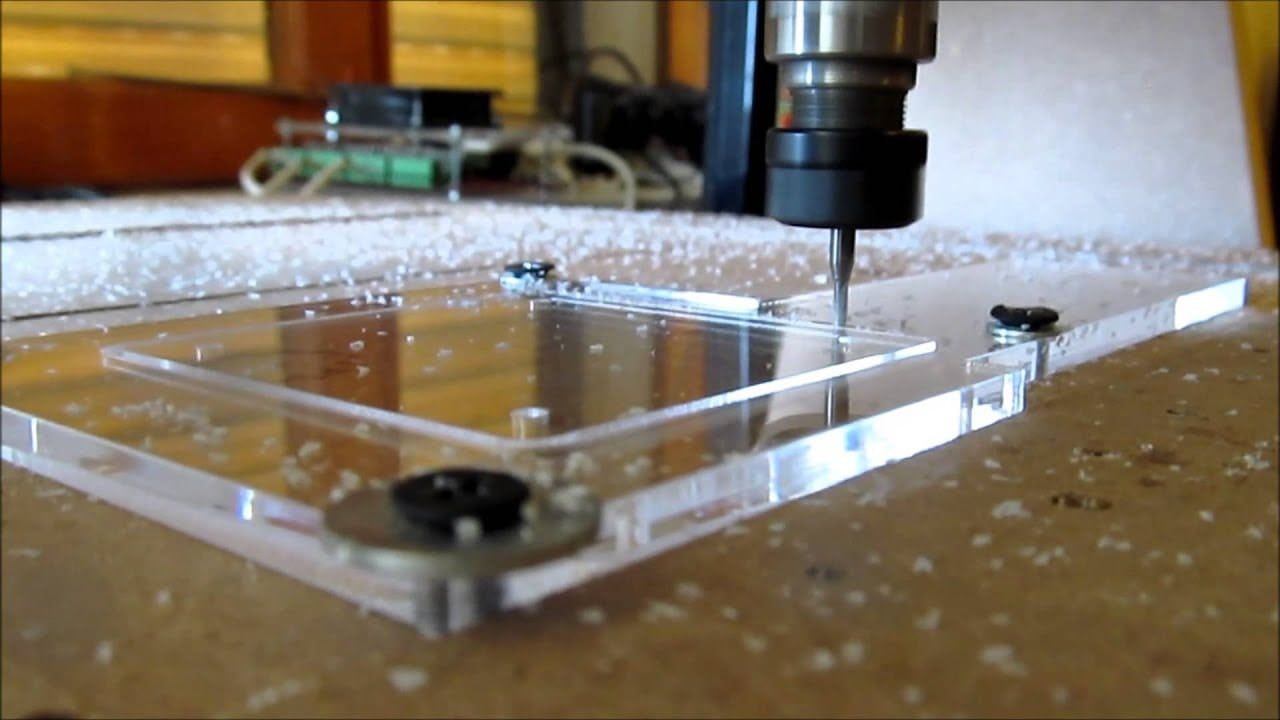
- CNC Routers: CNC routers feature automated tech to cut acrylic plastic based on programmed designs. It allows detailed and repeatable patterns with supreme accuracy.
CNC routers can handle more intricate cuts through computer-controlled precision. It requires technical expertise to operate even after a high initial investment.
Standard Cutting Process for Perspex: A Step-by-Step Overview
Cutting acrylic plastics is all about careful preparation, precise execution, and proper finishing. Only then it’s possible to achieve a professional-grade result upon navigating the entire process.
01. Preparation
- Clean the Sheet and Work Surface: Clean the plexiglass sheet to remove dust, fingerprints, and debris. Use a soft microfiber cloth with a mild soapy solution or an acrylic-safe cleaner to avoid scratches. Maintain a clean, flat, and organized workspace as a clutter-free surrounding minimizes distractions.
- Measure and Mark Cutting Lines: A measuring tape can determine and mark the desired dimensions on the protective film on Perspex. Apply masking tape over the cutting acrylic area to enhance visibility without scratches. Consider employing a non-permanent marker for clear and precise markings.
- Clamp the Sheet Securely: Position the acrylic sheet on a sturdy and flat surface (workbench). Use clamps to hold the acrylic sheet firmly in place. It should prevent shifting/moving during the cutting process. Place a protective layer (plywood pieces) beneath the acrylic sheet to let the blade pass through cleanly.

02. Cutting
- Using Hand Tools (for Thin Sheets): Position the plexiglass sheet with the marked line aligned slightly over the edge for easy access. Use a utility or scoring knife to score along a straight line.
- Apply pressure steadily and repeat the scoring 5 – 10 times to create a deep groove. Place the edge along a straight surface to apply pressure uniformly to snap the sheet cleanly.
- Using Power Tools (for Medium and Thick Sheets): Attach a fine-toothed acrylic blade to the jigsaw. Cut acrylic sheets along the marking with a steady speed. Cut slowly to avoid potential heat buildup when possible.
Or, fit the circular saw with a carbide-tipped blade. Begin with a slow feed rate to maintain consistent pressure to achieve a straight and smooth cut.
- Alternatively, put the table saw blade aligned and sharp. Set the blade height slightly higher than the sheet to ensure a clean cut. Push the sheet gently through the blade using a guide or fence for stability.
Consider moderate speeds to control heat generation, which can melt or deform the edge. Keep the saw blade cool by pausing or throwing water as a coolant.
03. Post-Cutting Finishing
- Sanding the Edge: Start with coarse-grit sandpaper (120) to remove roughness and sharpness. Wrap the sandpaper around a sanding block for better control. Gradually switch to fine sandpaper grits (240, 400, 1200) to refine the finish.
Wet sanding with water gets better results while reducing dust. Sand in a consistent direction along the edge to maintain uniformity.
- Polishing Techniques: Apply an acrylic-safe polish or a fine polishing compound to the edge using a soft microfiber cloth. Also, you can use a rotary buffer with a polishing pad for larger projects.
Set the tool to low speed to prevent overheating and work along the edge line gradually. Use a butane or propane torch to heat the edge lightly for a perfectly clear outcome with no overheating.

Choosing the Right Cutting Method for Perspex Acrylic Sheets
Selecting the most effective cutting method depends on various factors. The foremost considerations associated with the choice include the following –
a. Thin vs Thick Sheets
The thickness of Perspex has a crucial role in determining the cutting approach. Each thickness category demands specific techniques.
- Thin Sheets (Up to 5 mm): Thin sheets are lightweight, flexible, and easy to cut. Such materials are ideal for simple DIY projects or delicate designs. Create a narrow groove along the marked straight lines by scoring.
Snapping the sheet along the groove should deliver a clean edge. Meanwhile, a manually operated hacksaw provides precise cutting for small adjustments.
- Thick Sheets (Above 6 mm): These sheets require stronger gears due to increased rigidity and resistance. Circular saws, equipped with a fine-toothed blade, ensure a clean and straight cut for thicker sheets.
A table saw provides stability and precision for extensive cuts on large and thick acrylic sheets. Whereas, laser cutting is highly effective for flawless edging and intricate designs.
b. Straight vs Curved Cuts
The design and shape of the desired cut influence the choice of techniques. Understandably, straight ones are simple whereas curved cutting relies on precise execution.
- Straight Cuts: Straight cutting requires equipment capable of maintaining precise linear movement. Scoring is the simplest method to achieve clean cuts on thin acrylic sheets. Circular saws are ideal for medium to thick sheets with a smooth edge. Meanwhile, a table saw is perfect for large-scale cuts with consistency.
- Curved Cuts: Curved or intricate cuts demand flexible and maneuverable machinery or equipment. A jigsaw can easily craft smooth curves and non-linear designs. Adjusting the speed can prevent cracking or edge roughness. Laser cuts ensure unparalleled accuracy and smooth finishes for professional-grade cuts.

c. DIY vs Professional Projects
The chosen methods should align with the skill level and project requirements. Industrial projects differ significantly from at-home DIY measures.
- DIY Projects: DIY enthusiasts often tackle smaller projects with simpler designs. Easy-to-use machinery is essential to ensure safety and achieve satisfactory results. Scoring knives, utility blades, hacksaws, and jigsaws are suitable for DIYers who want to experiment.
- Professional Projects: Professional projects typically involve larger scales, complex designs, or higher precision standards. A circular or table saw is efficient for straight cuts on medium to thick sheets. Laser cutter offers the highest precision for intricate designs at large volumes.
CNC router offers automated cutting with exceptional accuracy. It seems perfect for industrial-grade projects or detailed patterns. Consider investing in high-quality gears and/or equipment to meet professional standards and minimize material waste.
Laser Cuts for Perspex Acrylic Sheets
As you should notice, the laser has been at the forefront of advanced methods to make Perspex cuts. It is actually one of the most effective and versatile options for professionals and hobbyists.
Advantages of Laser Cuts
- Absolute Precision: The concentrated light beam ensures ultra-fine cuts with accuracy up to fractions of a millimeter. This level of precision is unmatched by manual or mechanical cutting methods.
- Smooth Edge Finish: Unlike saws or blades, laser cuts produce a highly polished edge. That, too, often requires little to no post-cut finishing.
- Versatility: Laser can handle complex designs, intricate patterns, and even text. It’s equally good on straight and curved marks without sacrificing or compromising the quality.
- Minimal Material Waste: The method is highly efficient from start to finish. It reduces the likelihood of errors, uneven cuts, or wasted material.
- Contactless Cutting: The laser never actually touches the acrylic sheet. Therefore, the potential risks of dealing with chipping, cracking, or other mechanical damage become zero.
- Customization: It’s a method with extensive customization. Manufacturers can create detailed, unique, and intricate designs for specific projects.

Applications of Laser to Cut Acrylic
- Signage and Display Panels: Sharp shapes for logos, promotional signs, and display panels.
- Architectural Models: Complex structures and fine details for prototypes and models.
- Decorative Art: Intricate patterns for wall art, lighting fixtures, or jewelry designs.
- Industrial Components: components with tight tolerances for machinery to shield/casings.
- Packaging and Branding: a clean edge and polished appearance for professional packing.
Best Practices Involving Laser Cuts
- Choose the Right Laser Cutter: CO₂ laser cutters are recommended for Perspex sheets due to efficiency and precision. The machine should have adjustable speed and power settings for varying thicknesses.
- Optimize Settings: Adjust the power, speed, and focus based on thicknesses. Higher power is required for thicker sheets, while thinner sheets benefit from lower intensity.
- Ventilation and Safety Precautions: Acrylic cutting generates fumes. A well-ventilated work surface or extractor fan can remove odors and gases. Don’t forget to wear safety glasses along with your PPE and gloves.
- Regular Maintenance of Equipment: Clean the lens and bed regularly for maximum precision. Check the alignment of the laser beam to prevent errors or imperfections during cuts.
Limitations of Cutting with Laser
- Cost: Installation and maintenance are expensive for occasional users or hobbyists.
- Learning Curve: Operating a laser requires familiarity with CAD and machine settings.
- Restrictions: Extremely thick Perspex sheets may require specialized adjustments.

Mistakes to Avoid While Cutting Perspex Sheets Effectively
- Using Inappropriate Tools: Dull or incorrect blades (coarse-toothed saws) may cause chipping, cracking, or jagged edges. Always implement tools specifically designed for acrylic.
Fine-toothed carbide blades work great for power saws. And scoring knives or utility blades are ideal for thin sheets. No matter what, keep your tools sharp and well-maintained for clean cuts.
- Misjudging Sheet Thicknesses: You may attempt to score and snap thick sheets. The same goes for using excessive force on thin sheets to cause damage. Always tailor the method to thicknesses to cut acrylic sheets.
- Excessive Force while Cutting Acrylic: Too much pressure while cutting can cause cracks or an uneven edge. It’s a common phenomenon with manual tools or low-speed power tools.
Stick to controlled and steady pressure while letting the tool’s sharpness and speed do the work. Avoid forcing the tool through the material to avoid unnecessary stressing of Perspex.
- Ignoring Heat Management: Friction generated during cutting can overheat Perspex to cause melted edges and deformations. It often occurs from cutting acrylic at high speeds or ignoring cooling techniques.
- Overlooking Safety Measures: Ignoring safety precautions can result in injuries or accidents during the cutting process is a serious concern. Always wear safety glasses, gloves, and a dust mask to protect yourself.
Don’t spare room for encountering sharp shards, acrylic dust, and fumes. Keep the workspace well-ventilated and free of clutter to minimize hazards.
- Skipping Precise Measurements: Incorrect measurements often lead to wasted material or uneven cuts. Take your time to measure carefully. Mark cutting lines clearly and double-check the measurements.
Tips for Straight Edge (Best Perspex Cutting Results)

- Invest in the Right Tools: Use acrylic-based blades with fine teeth to minimize chipping and cracking. Go for acrylic-specific drill bits with a shallow point angle to reduce stress on the material with a power drill.
- Practice Before Working: Use scrap pieces to test your gear, methods, and settings. Practice scoring, drilling, or polishing techniques on smaller sections. Fine-tune machine settings (cutting speed or blade depth) to suit the material.
- Mitigate Heat Build-Up: Heat is one of the biggest challenges with Perspex. Excessive friction can cause melting, warping, or rough edging. Use slow-to-moderate speeds on power tools to reduce friction.
- Achieve Superior Edge Finishes: Polished edges are crucial for professional-grade results. Consider wet sanding for smoother results. It involves using water with the sandpaper to minimize dust and improve the quality of the flat surface.
- Optimize Bonding Techniques: Select acrylic-specific adhesives (solvent cement) for seamless bonding. Employ a small brush or syringe to apply the adhesive evenly to prevent air bubbles or excess glue.
- Maintain Protective Films: Perspex sheets mostly feature a protective film on both sides. Keep the films intact for as long as possible during processing. Remove the film only after all processing is complete to preserve the surface quality.
Conclusion
That should answer your query on how to cut acrylic plastic effectively. Industrial and professional measures combine precision and patience with the right gear that is specified for individual project needs. Advanced methods like laser cuts enable flawless precision for complex designs. Whatever method you choose, always prioritize safety from every aspect.
JUMEI ACRYLIC Employs the Best Methods and Techniques
Do you need premium acrylic cutting solutions? Jumei Acrylic Manufacturing is ready with the best experts, tools, and standards. We have years of experience that put the company ahead of others. Contact us for a quote or direct consultation from industry-leading professionals.


