Acrylic sheets, also known as perspex, are a versatile material used in everything from DIY projects to professional applications like signage, furniture, and displays. However, cutting acrylic sheets can be tricky—if not done correctly, you risk cracking, chipping, or uneven edges.
Why Cutting Acrylic Correctly Matters
Acrylic is a durable and lightweight material, but it requires careful handling to avoid damage during cutting. Improper techniques can lead to:
- Cracking or chipping: Ruining the material and wasting time and money.
- Uneven edges: Making it difficult to achieve a polished, professional look.
- Safety hazards: Flying debris or overheating can pose risks if proper precautions aren’t taken.
By following the right methods and using the appropriate tools, you can achieve clean, precise cuts that enhance your project.
Different Methods for Cutting Acrylic Sheets
Method 1: Scoring and Snapping Acrylic
Best for: Thin acrylic sheets (1/8″ or less).
How it works:
- Use a scoring tool or utility knife to score a straight line along the cut mark.
- Apply firm pressure and repeat the scoring process several times to create a deep groove.
- Place the scored line over the edge of a table and snap the acrylic along the groove.
Pros:
- Simple and cost-effective.
- Ideal for straight cuts on thin sheets.
Tips:
- Score deeply and evenly to ensure a clean snap.
- Use a straightedge to guide your scoring tool for precision.
Method 2: Using a Jigsaw
Best for: Curved cuts or intricate shapes.
How it works:
- Use a fine-toothed blade designed for cutting plastic.
- Secure the acrylic sheet to a workbench using clamps.
- Cut along the marked line, moving the jigsaw slowly to avoid overheating.
Pros:
- Versatile for both thick and thin acrylic sheets.
- Perfect for detailed or curved cuts.
Tips:
- Use a low speed setting to prevent melting.
- Apply masking tape to the cutting line to reduce chipping.
Method 3: Using a Circular Saw
Best for: Straight cuts on thicker acrylic sheets (1/8″ to 1/4″ or more).
How it works:
- Use a fine-toothed blade designed for plastics.
- Secure the acrylic sheet to a workbench with clamps.
- Cut along the marked line, moving the saw slowly and steadily.
Pros:
- Fast and precise for straight cuts.
- Ideal for larger projects.
Tips:
- Use a guide or straightedge to ensure a straight cut.
- Keep the saw speed low to avoid melting or chipping.
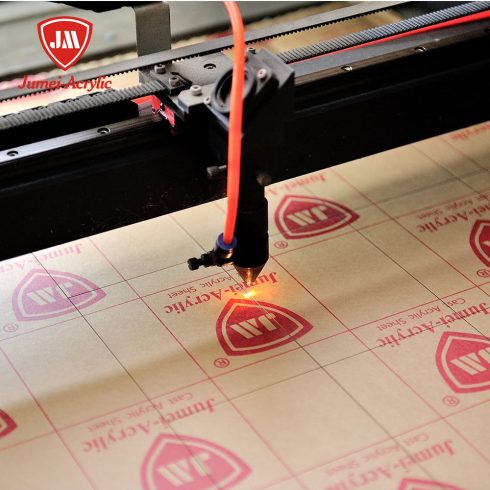
Method 4: Laser Cutting
Best for: Complex, intricate designs and high-precision work.
How it works:
- Use a laser cutter to follow a digital design file.
- The laser melts through the acrylic, creating clean, precise cuts.
Pros:
- Perfect for detailed or decorative projects.
- Minimal finishing required.
Tips:
- Best suited for professional or industrial applications.
- Ensure proper ventilation when using a laser cutter.
Choosing the Right Cutting Tool for Your Project
For Straight Cuts
- Scoring and snapping: Best for thin sheets.
- Circular saw: Ideal for thicker sheets.
For Curved or Intricate Cuts
- Jigsaw: Great for detailed designs.
- Laser cutter: Perfect for high-precision work.
Thickness Consideration
- Thin sheets (1/8″ or less): Scoring or jigsaw.
- Thick sheets (1/4″ or more): Circular saw or laser cutter.
Preparing Acrylic Sheets for Cutting
1. Measuring and Marking
- Use a ruler or straightedge to mark your cut lines accurately.
- Double-check measurements before cutting.
2. Clamping and Securing
- Secure the acrylic sheet to a workbench using clamps to prevent shifting.
3. Protecting the Surface
- Apply masking tape or protective film to the cutting line to prevent scratches.
Safety Tips for Cutting Acrylic Sheets
- Wear Safety Gear: Use eye protection, ear protection, and a dust mask.
- Work in a Well-Ventilated Area: Avoid inhaling fumes, especially when using power tools.
- Maintain Your Tools: Keep blades sharp and clean to ensure smooth cuts.
How to Finish Your Acrylic Cuts
1. Sanding Edges
- Use fine-grit sandpaper to smooth rough or jagged edges.
2. Polishing
- Apply a plastic polishing compound to achieve a glossy finish.
3. Cleaning
- Wipe the acrylic surface with a soft cloth and mild soap to remove dust and debris.
Cutting acrylic sheets doesn’t have to be intimidating. With the right tools, techniques, and safety precautions, you can achieve clean, precise cuts that elevate your projects.
Whether you’re using a jigsaw for curved cuts, a circular saw for straight lines, or a laser cutter for intricate designs, these methods will help you work with acrylic like a pro.